I forget the specifics but I think this happened at the 2015 IRAs. Yale’s trailer was hit or in some kind of accident on the way to Princeton and had three of their shells damaged … pretty brutally, as you can tell.
Tag: boat repairs
Video of the Week: Adjusting your foot stretchers
Adjusting your foot stretchers seems like it’d be a really simply thing to do – and it is – but without fail someone always manages to just completely screw it up and either rip out the entire footplate, lose a wing nut, or both (and 50% of the time one or both of those things happen when you’re on the water.) The most important thing to remember is to not remove the wing nuts when you loosen them – just keep them on the bolts and only loosen them as much as you need to in order to move the stretchers.
Related: Adjusting the seat tracks
Varsity rowers and coxswains, this would be something worth going over with the new novices on your team if it’s not something your coach hasn’t already mentioned or shown them.
Video of the Week: Adjusting the seat tracks
We had to do some track adjusting towards the end of the season with the IRA four and since it became a slightly more involved process than I thought it’d be I figured it’d be worthwhile to share this video to show how it’s done. Keep in mind that you should talk with your coach first if you think there’s an issue with your tracks (i.e. they’re not aligned, they’re too far forward/back, etc.) before you mess with anything, just to avoid damaging them or making any unnecessary changes.
Question of the Day
Hey! Our eight boat leaks really badly but there are no recognizable holes or scratches so the bottom of the boat fills up with about three inches of water at the end of every practice, making it really heavy and hard to get out of the water. Also it’s a really old boat so it is really heavy as it is. The group that rows in that boat is made up of entirely high school freshmen girls who are new to the sport of rowing either during the fall season or even as soon as three weeks ago. Our coach really wants us to learn how to carry the boat with only 8 people but it is nearly impossible, even for the varsity girls. Is it justified for us to ask for a couple more people to help lift and carry it? And is there any way to fix a boat where nothing seems to be wrong? Thanks!
I totally get why your coach wants you to be able to carry the boat with just eight people but I see your point too. When I was coaching my high school team last year (and when I was on the team) we would use this hilarious old wooden four during practice that was so heavy and such a pain in the ass to lift, especially when the women using it were all 110lb novices. For the first few weeks we’d always have a couple extra people help them out with carrying it but eventually they were able to do it themselves.
Ultimately though it comes down to one really simple yes or no question – can you lift and carry the boat with eight people without risking the integrity of the equipment and/or the safety of the rowers? If not then you should either ask to use a different boat until you can figure out what’s wrong with this one or ask a few other people to help you carry it. By a few other people I mean like two at most, simply because you do have to get used to carrying it without the extra help and it’s harder to do that when you’ve got four or six additional people on there.
I don’t know nearly enough about boat building or repair to know what could be causing the leaking issues, let alone how to fix something like that. The only thing that comes to mind is the vent caps not being closed (or at the very least not being closed all the way) and water getting in through there but I feel like that’s a really simple/obvious issue that someone probably would have noticed by now. If anyone has any ideas or has dealt with something similar, please leave a comment! Your best bet though (and by “your” I mean your coach since that’s his/her responsibility) would probably be to contact whoever the manufacturer is and get their opinion/advice. It might come down to the boat’s age being the issue but if it’s something that can be fixed then the boat reps would definitely be able to tell you what needs to be done.
Video of the Week: How to make minor shell repairs
While this kind of stuff is best left to boatmen and coaches I still think it’s worth knowing how to do (even though you should never actually attempt this on your own). Coxswains especially, this should give you a good idea as to how time-intensive these repairs are, so the next time you have a close call with a log on the water or a rigger on land, keep this video in mind.

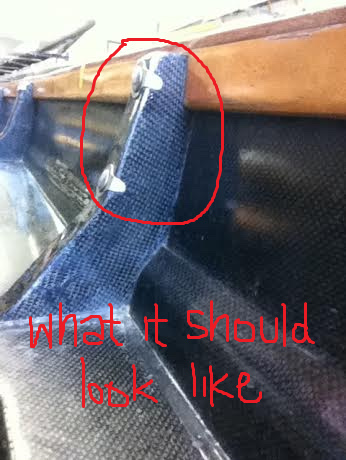
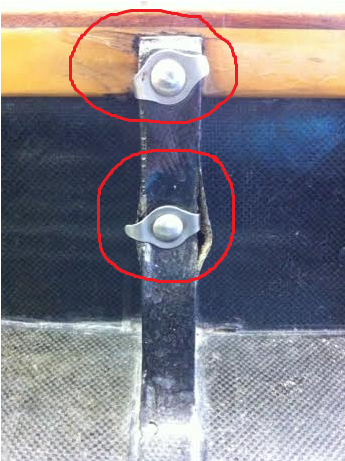
Don’t overtighten your riggers
So lately our varsity eight hasn’t been having the best time on the water and we found out yesterday what was causing the majority of their problems: the rib in the boat where 5-seat’s rigger attaches is broken due to being way overtightened over the years. This contributed to a lot of the set problems because … physics. I didn’t get to hear the full explanation because I was trying to do something else but suffice it to say, a broken rib in the boat pulls the rigger lower on that side, changes how force is applied through the water, and makes it very difficult for that rower to get their blade out of the water, amongst other things. Until we can get it fixed, we had to put the 5-seat rigger on port and move the 4-seat rigger to starboard, so we’ve got a weird bucket rig configuration going on in the middle of the boat.
We got this particular shell in 2004 when I was a junior, so it’s only 10 years old and the hope is that it lasts a couple more years before the team’s gotta buy a new shell. They just bought two new Resolutes within the last couple of years but that isn’t something that we (or most other teams) can afford to do on a regular basis, which is why taking care of the equipment is so important.
When you put your riggers on, only tighten the bolts finger tight, meaning no tighter than you can naturally turn them with your fingers. Your coxswain or coach will then go through with the wrench and tighten them more if necessary. There’s a lot more to the rigging of a boat than just tightening a few nuts and bolts (check out the “intro to rigging” tag for more on this) and if something happens where they end up too tight or too loose, the integrity of the entire shell’s rigging could be compromised, in addition to the height, pitch, spread, etc. of that individual seat.
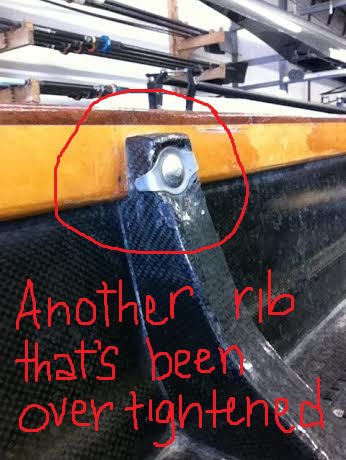
Below are a couple pictures I snapped yesterday before we went out that show what the rib should look like (the first photo) compared to what the broken one looks like (middle two photos). You can see how it’s buckled from someone getting a little too aggressive with their wrench. The fourth photo shows a rib that hasn’t broken yet but is getting close because of the same thing.


Take care of your equipment and make sure you spend the time showing and explaining how the riggers should be put on to the new people at your club.